

Achieving a flawless, sculpted look with contouring is the holy grail of makeup enthusiasts. However, just a few mistakes can quickly turn your contouring dreams into a makeup nightmare. Whether you are a contouring beginner or a seasoned pro, it’s important to be aware of the common pitfalls to avoid. In this article, we will shine a light on the top five contouring mistakes that can undermine your efforts to achieve a chiseled look. From using the wrong shade of contour to over-applying product, these blunders can make your makeup appear harsh, unnatural, and even unflattering. We’ll delve into the importance of selecting the right shades for your skin tone, blending techniques, and the right tools to achieve a seamless finish. By learning what not to do, you can refine your contouring skills and enhance your facial features with confidence. Say goodbye to muddy lines and patchy application, and instead, embrace a contouring technique that highlights your best features. Let’s dive in and sculpt your look with precision!
The Purpose of Contouring
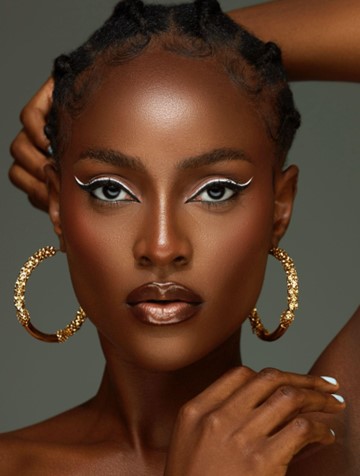
Contouring is a makeup technique that involves using a combination of darker and lighter shades to enhance the natural structure and shape of your face. By strategically applying shadows and highlights, contouring can create the illusion of higher cheekbones, a slimmer nose, a more defined jawline, and other desired facial features. The key to successful contouring lies in achieving a seamless blend between the contour and the rest of your makeup, ensuring that it looks natural and enhances your features rather than overpowering them. However, many people make the mistake of using the wrong shade of contour, resulting in an unnatural and unflattering appearance.
Mistake #1: Using the Wrong Shade
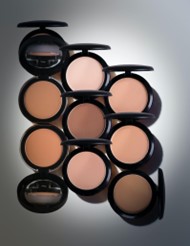
One of the most common mistakes in contouring is using the wrong shade of contour for your skin tone. Choosing a contour shade that is too dark or too light can create a stark contrast that looks harsh and unrealistic. To avoid this mistake, it’s essential to select a contour shade that is only one or two shades darker than your natural skin tone. To determine the right shade, consider your undertone. If you have warm undertones, opt for a contour shade with a warm undertone as well, such as a slightly bronzed or caramel hue. If you have cool undertones, choose a contour shade with cool undertones, like a taupe or ash brown shade. This will ensure that the contour shade blends seamlessly with your skin and looks natural. Additionally, be mindful of the intensity of the contour shade. If you have fair skin, choose a lighter contour shade, while those with deeper skin tones can go for a more intense shade. Remember, the goal is to enhance your natural features, not to create an artificial appearance.

Mistake #2: Applying Too Much Product
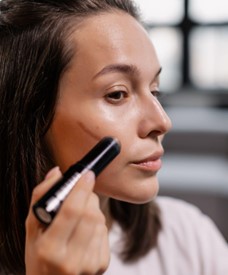
Another common mistake in contouring is applying too much product. It’s easy to get carried away with sculpting your face, but too much contour can result in an overdone and heavy look. The key is to start with a light hand and build up the intensity gradually. To avoid applying too much product, use a small, angled brush or a contour brush specifically designed for precise application. Tap off any excess product before applying it to your face. Begin by lightly dusting the contour shade along the natural hollows of your cheeks, the temples, and the jawline. Remember, it’s easier to add more product than to remove excess, so start with a light application and build up if necessary. Additionally, be mindful of the texture of the contour product you are using. Cream and liquid contours tend to be more pigmented, so use a light hand and blend well for a natural finish. Powder contours, on the other hand, are more forgiving and easier to blend, making them a great option for beginners.
Mistake #3: Blending Incorrectly
Blending is the key to achieving a seamless and natural-looking contour. Unfortunately, many people make the mistake of not blending their contour properly, resulting in harsh lines and an uneven application. Blending is essential to create a soft transition between the contour and the rest of your makeup, ensuring that it looks cohesive and natural. To blend your contour effectively, use a clean brush or a damp makeup sponge. Start by gently buffing the contour shade into your skin using circular motions. Be sure to blend the edges well for a seamless finish. If you notice any harsh lines, use a clean brush or sponge to blend them out. Remember, blending is a gradual process, so take your time and build up the intensity slowly. Pay attention to areas where the contour and highlight meet, ensuring a seamless transition between the two. The goal is to create a soft, diffused effect that enhances your features without looking harsh or heavy.

Mistake #4: Ignoring Face Shape
Another common mistake in contouring is ignoring your face shape which results in improper placement. Different face shapes require different contouring techniques to enhance their natural features. By understanding your face shape and contouring accordingly, you can achieve a more balanced and proportionate look. For example, if you have a round face, contouring the hollows of your cheeks and the sides of your forehead can create the illusion of more defined cheekbones and a slimmer face. If you have a square face, contouring the jawline and the sides of the forehead can soften the angles and create a more oval shape. If you have a heart-shaped face, contouring the temples and the sides of the forehead can balance out the wider forehead and create a more harmonious look. To determine your face shape, examine your facial features and note the proportions. Then, research contouring techniques specifically tailored to your face shape. By contouring strategically, you can enhance your natural features and create a more sculpted appearance that flatters your unique face shape.

Mistake #5: Overlooking the Importance of Lighting
Lighting plays a crucial role in how your contour appears. The way light hits your face can either accentuate or diminish the effect of your contour. Many people make the mistake of overlooking the importance of lighting when contouring, resulting in a less-than-ideal outcome. When contouring, it’s essential to consider the lighting conditions you will be in. If you will be in natural daylight, opt for a more subtle contour as natural light tends to highlight imperfections and make heavy makeup more noticeable. On the other hand, if you will be in dim lighting or under artificial lighting, you can be more generous with your contour application. To ensure your contour looks flattering in all lighting conditions, it’s a good idea to check your makeup in different lighting settings before heading out. Step outside, take a look in a well-lit room, and even snap a few photos to see how your contour translates in different lighting. This will allow you to make any necessary adjustments and ensure that your contour looks flawless in any situation.
Conclusion
Remember, practice makes perfect when it comes to contouring. Experiment with different shades, techniques, and tools to find what works best for you. With time and patience, you’ll master the art of contouring and be able to sculpt your look with confidence. So, embrace your inner artist, and let your contouring skills shine!
Can you contour like a pro? Do you have any other contouring tips and tricks? We’d love to know what you think! Email us at glambmarketing@gmail.com or message us on our Facebook page. And be sure to check out more great tips and articles on our blog!